 1
11) I photographed this interesting tile at Rug Chapel, near Corwen. Rug is a little gem. Even though it's very small, there's a wealth of decorative detail inside. The ceiling is covered with ornate paintings and the carvings on the ends of the pews are delightful.
I'm not sure if this bird is a swan, with its tiny cygnets. I used the shapes of the baby birds to make a printing block from self-adhesive foam. The repeated prints form a pattern, with alternating drops as found in brickwork.
I could envisage the white shapes in this piece stencilled on to Lutrador. The background could have watercolour paint or inks dropped on it. The whole think could then be treated with a heat gun and the paint would act as a resist. The resulting piece could be laid over a dyed background and the shapes outlined in stitch.
 2
22) For this print, I made a block based on the head of the bird (swan?). I actually made two blocks, each facing in the opposite direction and used them to make a simple pattern. I liked the graceful arch of the neck. The paint I used was Jacquard Lumiere (Halo, blue-gold), which is one of my all time favourites. The block pattern looked unfinished so I tried using lines to re-inforce the shapes, until they met up and became a design in their own right.
I'd like to try this design in layered applique with echo stitching around the motifs.
 3
33) This close up of the lower section shows the effect of the lines, which I drew with a pearlized gel pen.
 4
44) Everyone loves a happy accident! This is the paper kitchen towel I used to clean the printing block. After wiping off most of the paint, I then blotted the block several times with the towel, rubbing around it with my finger. When I removed the paper towel, I found this 'accidental' print. I really like it but I can't take any credit for it!
 5
55) This close up shows the texture of the paper towel, which adds interest to the print.
Cherubs and Angels
 6)
6)6) I found this beautiful, golden cherub on the church gate in Ruthin square. Although it's very high up, I managed to stretch enough to get a reasonable picture of it. I cut the A4 photograph in half and then filled in the missing side with paints, gel pens, metallic pens and Dutch Metal Leaf. I've been desperate to find an opportunity to use this for a while. It's so elusive and floaty that I
was practically chasing it around the table! Still, I've got it out of my system now (for a while).
It would be a challenge to incorporate the Dutch Metal Leaf into a textile piece - maybe with some gold/copper embossing powder. The end result would probably look quite old and distressed.
 7
77) I couldn't resist showing a close up of the Dutch Metal Leaf.
 8
88) This is another stone grave angel from Gorton Cemetery. I glued a page from a tatty, old book of hymns onto the background and washed it over with paint. As you can see, I found an angel hymn for this page. As I folded the paper to tear it, some of it just split. I had cut out the angel minus its wings and then stitched in the wings using metallic, silver thread.
 9
99) These are the wings from picture 8. This time, I stitched the body details in silver
thread
Stained Glass Windows
 10
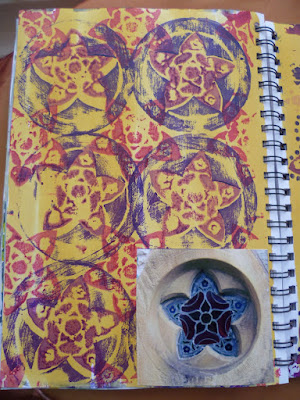
1010) I really liked this tiny window motif. I cut out another block from self-adhesive foam. Then I decided to cut out the centre and used that to print independently. The resulting pattern is quite informal ( mainly because I printed the insides first and then couldn't see properly where I was positioning the outsides. Whoops!)
 11
1111) This time, I printed with the centre block first. Then I just applied paint to the tiny motif in the centre, to make some very small, random prints. This print reminds me of an old-fashioned wallpaper design.
This design is crying out to be appliqued - maybe using Trapunto.
 12
1212) I wanted to depict part of this stained glass window, using different materials and techniques. On the left hand side, I used some of the chocolate wrappers which I have been forced to eat for the greater good of my Diploma work. I used a Pritt stick to glue them onto clear acetate sheet and then I drew the lines with a CD pen.
On the right, I used white tissue paper, slightly scrumpled. Then I coloured it with Koh-I-Noor paints and outlined it with a black drawing pen.

Sian suggested that I may want to look at related surfaces, i.e. other surfaces with holes. I coloured the background, to give more of a stained glass impression. The black lace braid on the left looks very like a formal stained glass pattern. Perhaps I should have coloured the other papers black before sticking them down!


